Showing posts with label Recipes. Show all posts

Friday, November 20, 2015

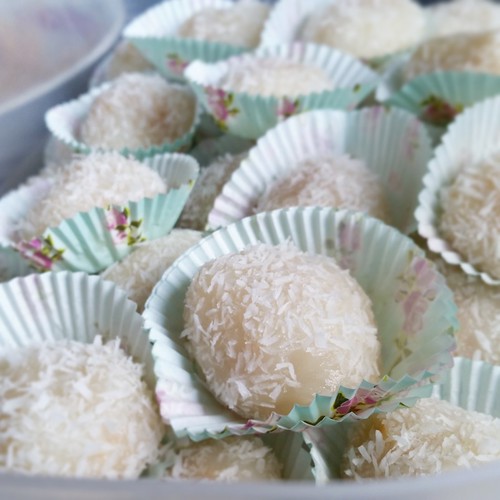
Recipe: Homemade Coconut Snowballs

IMG_20150704_162650

You've probably seen these in Chinese grocery stores or, if you're lucky, in pot lucks. These glutinous rice coconut snowballs can be filled with a variety of things like toasted ground peanuts, black sesame, sesame and sugar, or coconut and sugar. I've noticed that many cultures have a version of this. It's called nom plae ai in Cambodian, for instance; in Thai, it's kha nom tom; and banh bao chi in Vietnamese.

IMG_20150704_140615
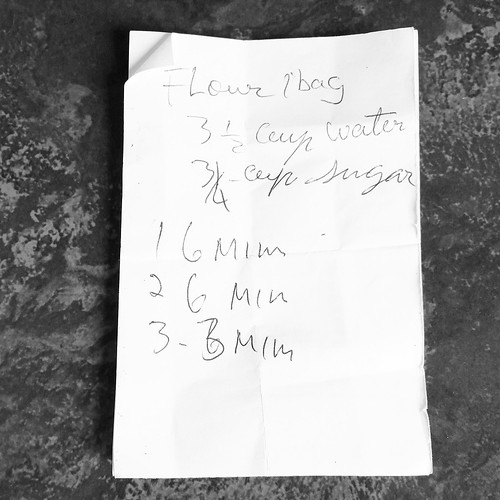
Here's the recipe Mom wrote down many years ago. She knew exactly what everything meant. I've seen her make this a few times so I'll try my best to break it down.

Sunday, September 22, 2013

Kongnamul Muchim, Seasoned Soy Bean Sprouts

On a rainy Saturday night, we decided to throw together a comforting meal of kimchi and mandu stew, seasoned soy bean sprouts (kongnamul muchim, 콩나물무침) and stir-fried cabbage.  It was a simple and quick meal that took about 30 minutes to put together, not counting the time it took to boil chicken broth and steam rice.


One of my favourite types of banchan (free side dishes to accompany the meal) at a Korean restaurant is kongnamul muchim, so I was excited to see that the recipe was relatively simple and easy to recreate at home.  The recipe was adapted from Maangchi's video.


It only took a few simple ingredients from my pantry (not including the soy bean sprouts themselves), including soy sauce, fish sauce, sesame oil, red pepper flakes, garlic, and green onions.  I had to reduce the amount of seasonings since I was only making a small batch to test the recipe.

It was a very forgiving recipe (adjust seasonings to taste), and it was one of the most successful Korean dishes I've been able to replicate.  This is now going to be one my favourite dishes to bring to friends' houses and throw together for those impromptu dinner guests!

Wednesday, July 10, 2013

Over-Ripened Bananas? Banana Pancakes!

20130708_085538a

We had over-ripened bananas in the kitchen. Every time that happens, Mom eventually makes banana cake with them -- I say eventually because we sometimes pop the bananas in a bag and then into the freezer.

It was getting a bit monotonous so I tried to think of different ways to use it. Using them in a smoothie is overkill. I couldn't really think of anything but pancakes. So I did a quick search three mornings ago and found this recipe from Pastry Affair.

Banana Pancakes
Adapted from Pastry Affair's Banana Cinnamon Pancakes.

3/4 cup all-purpose flour
3/4 cup whole wheat flour
1¼ tbsp baking powder
2 tbsp granulated sugar
1/2 tsp fine sea salt
1 large egg
2 large over-ripened bananas, mashed
1½ tsp vanilla extract
1½ tbsp vegetable oil
1/2 tbsp butter
1 cup of milk

20130708_083958a
All of the dry ingredients were mixed together in a large bow. Then I mashed the bananas separately in a bowl with a fork. Once that was done, I added the rest of the ingredients -- except the milk -- into the dry ingredients. I mixed everything together and slowly added the milk. That's it.

Mom was getting ready for work and saw what I was up to in the kitchen.


"What are you making? Banana cake?" She asked.


"No, I'm making banana pancakes." I answered. "It's not the same."


I heated our griddle to medium-high. While that was doing its thing, I melted a little butter and mixed it with a bit of vegetable oil to raise the burning temperature of the butter. We love to cook pancakes with butter in our house.


20130708_084017a

Personally, I like mine almost deep-fried. When you add enough butter-oil to the hot griddle and then add the pancake batter, it should have a crust. I made a small pancake as a tester. I found the pancake a bit too thick so I added a little more milk to the batter.

I was a disappointed in the taste. I mean, they tasted great, but they just tasted like banana cake. The whole point of making banana pancakes was to avoid making banana cake. I have no idea what I was thinking. Even when I read the recipe again, it screams banana cake to me. Womp womp...


20130708_092620a

Despite the likeness to banana cake, the pancakes were still tasty. I made a warmed up some peanut butter and mixed it with some syrup to make a peanut butter syrup. It was so good! Andrew melted some semi-sweet chocolate with peanut butter for his pancakes. We washed the pancakes down with some cold milk. I was ready for a nap after that.

Monday, February 18, 2013

Butternut Squash Soup, Paninis, Macarons

On Saturday evening, I got together with some friends for some food, hockey, and board games.

20130216_2

VN and I went grocery shopping for the ingredients. Do you ever look at other people's shopping cart contents when you're in line at the grocery store and try to figure out what they're planning to make? I thought it was funny when we checked out of one stores because of what we picked up. Ignore the creepy cyclops in the photo.

Let's focus on the Nutella, havarti cheese, and chicken broth for a second. Those three ingredients would be hilarious in one of those mystery box challenges in a cooking show. How about a french onion soup with Nutella croutons? Uh... savoury soufflé with a Nutella sauce? Err... how about a sweet and salty Nutella havarti quesadilla with chicken broth mousse? No? Okay.


20130216_4

20130216_5

VN and DG made the banh pâté chaud using a homemade pork filling (ground pork, celery, onions, fish sauce, salt, sugar, black pepper, cornstarch) and store-bought puff pastry.

20130216_3
The butternut squash soup was very easy to make. After the tough squash skin was sliced off, the diced butternut squash was added to a pot of sweated onions. The chicken broth was poured into the pot and then the contents were brought to a simmer. Once the diced squash became tender, the contents of the pot were blended in batches and then returned to the pot. The puréed soup was seasoned with cayenne pepper, salt, black pepper, and a hint of nutmeg.

Butternut Squash Soup
Revised from the Food Network's recipe

1 Butternut Squash
2 tbsp Olive Oil
2 Small Onions, Diced
5 cups Chicken Broth
Nutmeg
Cayenne Pepper
Salt and Black Pepper

The spiciness of the soup, from the cayenne pepper, increased with every spoonful of soup that we enjoyed. Not everyone was able to handle it. But the person in question is a lightweight when eating spicy foods. And that's where the variety of paninis became saviours.

20130216_1
To eat with the butternut squash soup, we made a few paninis out of a variety of proteins and bread. There was a rotisserie chicken with avocado one, a spicy cappicolo with havarti, and a serrano ham with Granny Smith apples. The sandwiches were pressed and then cut into slivers so that people could try multiple combos.

The paninis broke up the spiciness and allowed our palates to enjoy different flavours and textures. Why are paninis and soups so amazing together?

20130216_6
JL brought over some Oreo cheesecakes that he made. It's too bad that almost half the people there were sensitive to lactose. The cheesecakes tasted good to me.


20130216_7
We attempted to make macarons after being inspired by my friend behind the blog Delishsis. Nicole and her sister made cute heart-shaped strawberry macarons for Valentine's Day and I thought: hey, we can try making macarons for dessert! It doesn't look that hard. I was foolish to think that. We based our macarons on Anna Olson's french macaron recipe. And as you can tell from the top photo in the collage above, we didn't have enough egg whites. When VN piped the macaron batter onto the baking tray, they ended up looking like piles of turd. Quite lovely, if I do say so myself. They're not supposed to look like that. Hahaa!

20130216_8
Despite not being photogenic, the Nutella macarons were quite yummy. One of the problems we had was using almond meal that wasn't ground finely. The texture of the almonds went with the Nutella filling. It was like a deflated Ferraro Rocher macaron.

I'd definitely like to recreate everything we made. The butternut squash was easy and tasty. It was fun to try different combos when making paninis. And those macarons; the results have not discouraged me one bit.

Wednesday, October 31, 2012

Homemade Spinach Dip

20121019_4965

Earlier this month, we were rummaging through the fridge when we discovered blocks of cream cheese. It was like treasure hidden in a cave. Who needs blocks of gold? We also found some spinach in one of the drawers too. Add cream cheese and spinach together (along with some other ingredients) and you get a snack that you can't stop eating.


Can you believe that Richard has never had spinach dip before? I told him that places like Milestones and Bâton Rouge serve them as appetizers.

In any case, Richard quickly did a search for recipes and glanced through a couple to get an idea of the basic ingredients. Then he just whipped it up. It was so good the first time that the family requested a second batch the next day. The spinach dip tasted surprisingly similar as the first batch. The only difference was that there was more spinach and less cream cheese. Here's what he used:

Richard's Spinach Dip

1 small onion, diced

One bunch of spinach, blanched
1 block of cream cheese
Season to taste with Cool Runnings All Purpose Seasoning
or
Season to taste with garlic powder, cayenne pepper, paprika, salt, and black pepper

20121019_4955


20121019_4957
He was going to dice up two small onions, but Lucy told him otherwise. The onions were sautéed with some butter and oil.

20121019_4959

20121019_4969
Richard took one bundle of spinach, washed it, blanched it, roughly chopped it, then mixed it with the sautéed onions. The cream cheese was stirred into the warm onions and spinach, then we seasoned it with some "Cool Runnings All Purpose Seasoning." You can use garlic powder, cayenne pepper, salt, and black pepper if you like. But really, you can season the spinach dip with whatever you feel like.

Since our family loves cheese, we scooped the spinach dip into a ramekin and topped it with slices of cheddar cheese. The spinach dip was popped into our toaster oven and baked for about ten minutes. But if you're impatient like us, you can also nuke the spinach dip until it's warm (without the cheddar cheese topping) and then adding the cheddar cheese before broiling the spinach dip until the cheese becomes golden.

20121019_4984

20121019_4988
Lucy and I personally love eating spinach dip with warm fluffy flatbread, but you can serve the spinach dip with corn chips, veggies, or crackers. Hell, you could probably spoon it out of the bowl and it it like peanut butter. #fatlikethat  She also tried spreading some spinach dip in a sandwich. It apparently turned out really well.

20121019_4968
On another note, Richard made some sort of pasta sauce with celery, onions, tomato sauce, and a bunch of herbs we had in the kitchen. It was overly salty and the herbs were too heavy. He admitted to not tasting the sauce before serving. Fail... Come to think of it, he didn't taste the spinach dip either.

You can probably make the spinach dip form scratch in less than ten minutes and eat it even quicker. It's an addictive snack. We're thinking about making a giant batch and Aunt IS' crab dip for our Christmas dinner. We'll have more appetizers, less turkey and fixings, but more desserts. Sounds awesome!

Wednesday, October 24, 2012

Indian Night: Dal Nirvana, Butter Chicken, Rice Pudding

Last Wednesday was Indian night at CA's. We made dal nirvana, butter chicken, and rice pudding in her tiny kitchen. All three dishes began at the same time, which was fine because the rice pudding was still warm when we were finished eating everything else. Considering the size of her kitchen, we were also efficient and didn't even bump into one another.

We didn't make the naan from scratch this time. I ended up buying some fluffy pita bread on my way home from work. When I was in the bakery area of the grocery store, I couldn't find Greek pitas anywhere. It's a great substitute for the pricey naan (President's Choice brand - 2 for $2.99). I stumbled upon some pita bread (8 for $2.69) and figured it would be fine to get them instead of the naan. The pita breads that I bought were closer to Greek pita breads than it was to the thin pita breads I'm used to. It was more cost efficient too. Second carb option: check.

20121017_4928

Simplified Butter Chicken

4 boneless chicken breasts
1 can of diced tomatoes
2 tbsp minced ginger
1 clove garlic, minced
2 small onions, finely diced
1 tsp sugar
Tandoori masala and sour cream to taste
2 tbsp butter
1 tsp olive oil (vegetable oil is fine too)

The chicken breasts were trimmed of the connection tissues and then diced. Tandoori masala was mixed with the chicken breasts to briefly marinate. I'd recommend you do this the night before and then leave it in the fridge overnight, if you have the time.

In a medium-sized pot, the ginger, garlic, and onions were cooked with the olive oil and a bit of butter over medium-high heat until fragrant. (The oil is there to prevent the butter from burning.) The diced tomatoes and sugar were mixed in. Then I seasoned everything in the pot with tandoori masala to taste. The contents were simmered on medium heat for about 5 mins.

The briefly-marinated chicken was added to the pot and cooked for about 10 minutes. Once all of the chicken was fully cooked, the sour cream was added to taste. After getting a second opinion and one final taste, we adjusted the flavour with more tandoori masala. The heat was turned off and then served with steamed rice, warmed flatbread, and dal. I'll get to the dal in a bit.


We had a few issues with the butter chicken. The first problem was that I forgot to drain the diced tomatoes. The addition of water made the sauce really watery, so to thicken it, we made a slurry of water and cornstarch*.
*When we made the slurry, we tempered the slurry instead of mixing it into the butter chicken right away. We added a few spoonfuls of cooking liquid to the slurry to bring up the temperature. After the slurry and cooking liquid was mixed thoroughly together, a few more spoonfuls of cooking liquid was mixed in and then everything was added into the pot. If we tried to mix in the slurry directly into the pot without tempering the slurry, the slurry would've cooked soon after being poured in.

The second issue was that we used yoghurt instead of sour cream. At first, we tried adding a few spoonfuls of 0% fat yoghurt but that separated soon after we mixed it into the butter chicken. (0% fat yoghurt? Does not compute...) The pot was taken off the heat too. We added 2% fat yoghurt afterwards and it didn't separate as easily.

20121017_4931

Dal Nirvana
Recipe adapted from Budget Bytes' version

1 can brown lentils
1 can diced tomatoes
2 cloves garlic, minced
1-inch ginger, minced
1½ tsp ground cumin
½ tsp cayenne pepper
2 tbsp butter
½ tsp olive oil
½ cup cream

Since the canned lentils were already cooked, we first cooked off the garlic and ginger with the olive oil and a little bit of butter over medium-high heat until fragrant. The canned of diced tomatoes (seasoned with black pepper) was mixed into the pot and was allowed to cook down for about 5 minutes.

The drained and rinsed lentils were poured in with the cumin and cayenne pepper. The heat was turned down until the lentils gently simmered. Everything was cooked for about 10 minutes.

The cream was stirred in when most of the liquid reduced to a creamier consistency. We tasted the lentils and then adjusted the flavour one final time before serving with steamed rice, butter chicken, and warmed flatbread.

20121017_4941

Rice Pudding
Recipe adapted from All Recipes' version of Indian rice pudding (kheer)

2 cups coconut milk
2 cups milk
3 tbsp sugar
¼ cup basmati rice
½ tsp ground cinnamon
¼ tsp ground nutmeg
¼ cup dried cranberries

In a small pot (which was able to hold 5 cups of liquids), the coconut milk, milk and sugar was brought to a simmer over high heat. The basmati rice was stirred in once the milk just before the contents began to boil. Cinnamon and nutmeg was stirred in and the heat was turned down to a gentle simmer.

With the pot uncovered, the contents were allowed to cook for about 15 minutes until the rice was cooked. Once the contents had reduced to a creamy consistency, the pot was taken off the heat. The dried cranberries were mixed into the rice pudding and then covered the pot with the lid. The pot of rice pudding waited patiently off the heat as we ate our entrée.

Butter chicken: Done.

Dal: Check.

Steamed basmati rice: Yup.

Pita bread: Lightly toasted and buttered.

CA, JL, and I plated up as we continued our conversation. We didn't even stop at all. We passed the plates back and forth in a coordinated dance.

Service please! *Ding* Oh wait... we're the servers too.


We sat down and took a few photos before we began eating. Since we thickened up the watery butter chicken with cornstarch and also used yoghurt instead of sour cream, I felt like the flavour wasn't as rich as the last time I made butter chicken. I tried my best to adjust it with more tandoori masala and salt, but it wasn't the same. CA, AA, and JL were fond of the butter chicken though.

The dal was pretty good. I ended up adding a bit more cumin at the end, which I regretted. The cumin was on the stronger side. I think the dish needed diced onions and bursts of fresh cilantro.

There were enough leftovers for two generous lunch portions.

20121017_4943
The table was cleared and then we brought out the warm rice pudding. I wouldn't call it an Indian rice pudding though, since we omitted the spices. Hahaa! The rice pudding still looked great in the glasses. The pudding wasn't overly sweet and the addition of coconut milk added a nice touch of richness. The flavour of the coconut milk was in the background and complimented the cinnamon and nutmeg pretty well. I was skeptical of the flavour combinations when I heard the recipe at first but it worked.

We washed down the rice pudding with green tea -- not very Indian, we know. It was still a fun night of cooking and catching up. From start to finish, it only took us about an hour and a half to make the three dishes. Not bad at all.
Saturday, August 18, 2012

Sweet Potato-Filled Vegan Ravioli

Earlier last month, I ordered an interestingly tasty ravioli dish at Milestone’s. The raviolis were filled with butternut squash and were baked in a spicy tomato sauce. There were toasted pecans, dollops of goat cheese, and ribbons of sweet Thai basil, all of which elevated the plate of ravioli to a different experience. I was pleasantly surprised at how well all the components hit all the right notes. There was textural contrast, a variety of flavours – none of which took the attention away from the butternut squash-filled raviolis. Every bite was surprisingly delightful.

20120729_4307

When I thought about the composition of the dish, it seemed easy to recreate. Homemade pasta, butternut squash or sweet potato filling, spicy tomato sauce, toasted pine nuts or something else, goat cheese, and Thai basil. No problem.

VN and I thought of a menu and picked up some groceries. Since Ontario corn was on sale that week ($2.99 for a dozen), corn was the menu twice:
  • Pot ang, a Cambodian take on grilled corn
  • Sweet potato-filled ravioli
  • Che bap, a tapioca coconut pudding with shaved corn

Thursday, August 09, 2012

Nem Nuong aka Vietnamese BBQ Pork Meatballs

20120718_3957

A few months ago, I made Vietnamese-style meatballs at VN’s place from scratch. We were originally going to make Chinese-style meatballs from a cookbook, but I just made my own version. Since she didn't have things like oyster sauce, I just used what she had in her kitchen. It ended up tasting like a Vietnamese dish. Woops!

Starting with ground pork, finely chopped cilantro, minced garlic, and a row of crushed crackers, I mixed everything together until the smell of cilantro and garlic seemed right. Then I seasoned it with sugar, soy sauce, and fish sauce. Since the flavour was clearly Vietnamese rather than Chinese, I just went with it.

When the consistency felt right and when it smelled right, I nuked a little nugget in the microwave with a bit of water to taste it. After tasting it, I added just a bit more sugar and fish sauce. I tried it again. I was happy with it. KN and VN gave it a try. They approved of them and said it tasted familiar. “They remind me of nem nuong (which are seasoned grilled pork meatballs) that you typically serve on skewers with vermicelli or in rice wraps,” VN commented.

The meatballs were browned in a pan and became tender and juicy. While I didn’t take photos, you’ll have to take my word for it. They were really good. These would be perfect for a picnic outside! I made too much because we were expecting other company that never showed, so we froze half of the seasoned meat and made them again a week later. Since making the nem nuong/Vietnamese-style meatballs, I’ve wanted to recreate it.

20120717_3889
During a grocery trip to T&T, I picked up cilantro and ground pork so that I could try making the meatballs again. You can totally substitute the ground pork for something else like ground chicken. We didn’t have any crackers in the house or bread, but we had leftover rice. I thought I’d try and replace the cracker crumbs with leftover rice, having cabbage rolls as a reference point. I also finely chopped up some fresh mint to add another dimension.

20120717_3898

20120717_3915
After combining all the ingredients, I roughly measured out 5 tablespoons of sugar and 7 tablespoons each of soy sauce and fish sauce. It smelled like I over-seasoned it and it looked too dark, so I scooped a bit out and cooked it in the microwave. When I opened the microwave door, the smell of fish sauce hit me right away and it was followed by soy sauce. Shit… I took a bite. I was right. There was too much fish sauce and soy sauce. I couldn’t dull the saltiness with sugar, so I chopped more cilantro and mint.

20120717_3917
Though they were still very salty, it did taste similar to the first rendition I made at VN’s place. Close. The leftover rice didn’t do a great job of absorbing the liquid. I’ll avoid adding leftover rice in the future. The cooked nem nuong was a bit loose and had a tough time maintaining it’s shape. I added an egg to help bring it together. I threw a few slices of some milk bread, ripped them into little pieces and tossed them into the mix, in hopes that the toast would absorb some moisture. The mixing bowl was wrapped in a bag and placed in the fridge to marinate overnight.

Throughout the process, I tried to write down rough measurements in hopes that you, too, can taste how good these were. If you do try this out, please taste the meatballs and adjust to taste like I did.

Nem Nuong aka Vietnamese Ground Pork Meatballs

1lb ground pork
5 cloves of garlic, minced
5 tbsp fish sauce
5 tbsp soy sauce
5 tbsp sugar
1/3 cup finely chopped cilantro
4 tbsp finely chopped mint
½ cup breadcrumbs or cracker crumbs*
Black pepper, to taste

*I didn’t have dry breadcrumbs or crackers so I used the following:
3 slices of toast, crumbled and torn
1/3 cup leftover rice


On the following day, we fired up the BBQ and cooked the nem nuong. I pretty sure the meatballs needed to be cooked on medium heat to allow the sugar to caramelize.

20120718_3966
While the meatballs were being cooked, Mom sautéed some zucchini with salt, pepper, and a bit of olive oil. Then she added chopped mint.

20120718_3969

20120718_3973
It was another sunny day out, and so we ate in our backyard again. Dad made a pitcher of spiked Clamato (a mix of tomato juice and clam juice). Richard bought some baguettes and I brought out some of Dad’s homemade kimchi. Some of the meatballs burned because the BBQ was cranked up on high.

20120718_3985
Even though we ate the nem nuong with bread, they were still too salty to fully enjoy them. The flavours of cilantro came through really well, but I’d probably add more garlic and mint. In hindsight, I should’ve gotten more ground pork to dull the soy sauce and fish sauce. Richard and Lucy really liked these. I'll have to be less generous with the fish sauce and soy sauce next time. But still, fresh bread, homemade Vietnamese meatballs, sautéed zucchini, and a pitcher of ice-cold bloody caesar made a great meal.

Friday, August 03, 2012

Baked Penne with Cheese

Since moving back from Toronto, I've rarely made macaroni and cheese or any pasta for that matter. While other people resort to instant noodles, pasta and cheese was my go-to quick comfort food. Using the small bits of cheese still leftover from all the homemade pizzas, I made a quick penne with cheese. I don't usually cook with a recipe, but Blog Chef's recipe looks similar to my version. I have written a rough recipe in the past. And by rough, I mean the measurements weren't exact. Should you dare to try out this recipe of mine:

1 cup                       Macaroni, Rotini, Penne or Baby Shells
4 tsp                        Butter
4 tsp                        Flour
1½ cups                 Milk
1½ tsp                    Chicken Bake/Broth Mix or Salt (I use the bright yellow one)
1½ cup                   Cheese (I use old cheddar, but sometimes make it with mild cheddar)
Sprinkle                 Black pepper (Optional)

20120710_3870

Although I love baked cheese, I typically don't bake the pasta with cheese because I never have the patience. On this occasion, I undercooked the pasta a bit and then made the mornay sauce with mozzarella cheese. The pasta was incorporated with the cheese sauce and then added to the lightly greased and floured baking pan. Since I just wanted the cheese to brown on top, I just broiled the pasta until it was done.

20120710_3871
While the pasta was let to cool on the table briefly, I grabbed my camera and took these photos.

20120710_3875

20120710_3878
While the pasta was in the toaster oven, I went through the fridge and made myself a side salad. I have to admit that I added too much cheese. The sauce needed more milk. It certainly doesn't look like there was too much cheese though.

Monday, July 30, 2012

Summer Snacking: Pot Ang and Chinese-Style Chicken Wings

20120702_3599

A few weeks ago, Grandpa bought some corn and dropped some off at our house. He likes to stock up on groceries that are really cheap and then distribute the goods among our extended family. Grandpa originally told me over the phone that he picked them from his garden, but when I passed on the message to Mom, she gave me a look. When I saw that look, I knew that Grandpa was trolling. We were going to a family potluck picnic at the beach, so grilling corn would be a perfect snack in the heat.

Two dishes come to my mind when I think of corn: pot ang (grilled corn) and a corn dessert with small tapioca pearls. While I already wrote about pot ang, I thought I’d give a revised recipe.

6 tbsp coconut milk
3 tbsp fish sauce
1/3 cup sliced green onions
1 tbsp sugar

Mix all four ingredients together in a bowl. Taste it. You should get hit with the coconut flavour first, quickly followed by the fish sauce and then at the end, there should be a little sweetness. That's with these proportions anyway. Once you're happy with the taste, you're ready glaze your grilled corn. We had 10 ears of corn and we had just enough. You can also water the glaze down a bit if you have more corn.

20120702_3522

20120702_3512

20120702_3527

And with all recipes, you can tweak the measurements to cater to your family’s tastes. You can still taste and smell the fish sauce in this glaze, so if you have family members or friends that are sensitive to seafood, you can cut the amount of fish sauce down to 1½ tablespoons instead. Substituting fish sauce with salt won’t work, but perhaps you can try miso or something else with umami. I'm not saying it'll work. But it might.

Monday, July 09, 2012

Homemade Sheet Pan Pizzas

20120630_3468

The basil that was planted a little less than two months ago has grown so much! I was beginning to worry that the basil wouldn’t grow well, because they didn’t grow much for almost a month. But then we had heat wave and the basil thrived and sprouted large happy green leaves. The weather then cooled off and then we had some rain for a few days. I didn’t want to make pizzas on a rainy day, so I waited until the weather warmed up again before I invited some friends over.

Looking through my bookmarked recipes on my browser, I found a recipe for a bread that didn’t need any kneading. Using the The Gouda Life’s adapted recipe as a guideline to my dough, I made something similar. I more or less followed the recipe, which made six personal pizzas:

6 ½ cups all-purpose flour
3 cups of lukewarm water
1 ½ tbsp active dry yeast
1 ½ tbsp salt

20120630_3463

I made the dough sometime around 2 pm on Friday, though I had planned to make it the previous night. We ran out of yeast so I had to buy some more. The weather in Ottawa was quite warm and humid that day – perfect for making the dough proof quicker. It rose beautifully in the weather. I took the risen dough and divided it into six balls of dough to proof one more time. The dough balls were covered with a moist towel and slowly rose in the back of our kitchen until my friends arrived. Unfortunately VN couldn’t make it to dinner, but she was able to make it on Saturday instead. No problaaaam! I’ll just make moaaaar pizza dough!

Friday, June 29, 2012

Pot Ang aka Cambodian Grilled Corn

20090627_6176

Instead of the typical boiled corn or grilled corn, how about changing it up this year by injecting some life into the corn and making Cambodian-style grilled corn called pot ang? It's not difficult at all.

20090627_6179
There are only four ingredients for the glaze: [Edit: Added actual measurements]

5 tbsp coconut milk
2-1/2 tbsp fish sauce
1/4 cup sliced green onions
1 tbsp sugar

I can’t give any measurements for the glaze since Mom just eyeballed it and then adjusted it by taste. This particular batch was watered down a bit (about 2 tbsp water). But what I can tell you is that the fish sauce is needed to provide the saltiness and a savoury hit. If you're afraid of using fish sauce, don't be. The smell and flavour mellows out. You can't really replace the fish sauce with salt. It's just not the same.

20090627_6183
The corn was blanched prior to grilling and glazing, which made everything quicker; however, you can also cook the corns straight on the grill. It will just take a bit longer.

20090627_6191

20090627_6212
The ears of corn were basted throughout the grilling process. We found an easier method to reduce the dripping. An ear of corn was held over the bowl of the coconut glaze and then the glaze was spooned onto the corn from the top. The excess glaze was shaken off and then the corn were returned to the grill to caramelize some more.

20090627_6196

20090627_6200
The process is repeated until the glaze is used up or until all the corns finish cooking – whichever comes first. Be sure to give all the corn some love. According to the people behind the Gastronomy blog, you can find grilled corn that is similar to pot ang on the streets in Vietnam.

The coconut-scented ears of corn were imbued with a savoury depth. The salty-sweet corns were so addictive! Next time you buy corn, try making this glaze instead of the one you typically use. You'll be transported to Cambodia. And if you want to make it a more authentic experience, go to a park, grill up the corn using the glaze, and then squat while holding the corn and just enjoy it with Cambodian tunes playing on the mini-DVD player. I'm not making this up. Our family still does it occasionally. We rarely forget the pot of rice when we go to the park.

Enjoy the weekend. And to all the fellow Canadians around the world: Happy Canada Day!

LinkWithin

Related Posts Plugin for WordPress, Blogger...